
Friday, August 31, 2012
Fashion Friday: Fall Into Red...
I've got a fashion inspired manicure for you today. This is inspired by a Jenny Packham dress right of the Fall/Winter 2012 runway. Please don't be fooled, I have no idea what I'm talking about. I am really not someone who keeps up with current fashion or what's hot on the runways. This dress just caught my eye on Pinterest and I turned to trusty Google to clue me in on the designer. I figured it was perfect to go along with a shade from Zoya's runway Diva collection...


Thursday, August 30, 2012
Tutorial: Peel Off Base Coat
I recently learned of this technique and while it is not my original idea I wanted to share a quick tutorial with you because it is just pure genius. Anyone who wears glitter nail polish will know what a pain in the behind it is to remove. Sure there are tricks to make it easier such as the foil method, but how great would it be to not have to soak your fingers in acetone? Essence recently came out with a peel off base coat which does just that. It didn't take long for those who tried it to notice that it bears a strange resemblance to craft glue... which leads me to this extremely cheap, simple and effective peel of base coat...
Supplies:
Steps:

Instructions:
I will definitely be wearing glitter more often now! A little bit of waiting for the "base coat" to dry is nothing compared with the pain of glitter polish removal!
How long does it last?
That will depend on whether someone picks at their nails or not. Using the craft glue as a base coat will certainly not last as long as other base coats especially for those who pick at their nails. For those who are not pickers it can easily last for a few days. I've tried it a few times and it has lasted perfectly for a full day of wear until I chose to remove it. It easily survived through showers and dish washing which was my primary concern with a water based glue...
Is it safe?
Craft glue is safe and non-toxic. Children for generations have used this in schools, some I'm sure have even eaten it (although I would not recommend that). I will venture to say it is much safer than soaking your nails in acetone to remove glitter...
Really brings back childhood memories of putting glue on my hand and letting it dry just to peel it off later...
Have you tried this technique? Let me know what you think of this or if you have any questions! :)
UPDATE: Gina of Soguesswhat11 did a fantastic test wear video of this technique. Take a look to see how it holds up to days of wear compared to a regular base coat and even basecoat under glue!
Thanks for looking!
Anutka :)
Supplies:
- Elmer's School Glue (washable, safe, non-toxic)
- Empty nail polish bottle
- Polish of choice
- Cuticle pusher (optional)
Steps:
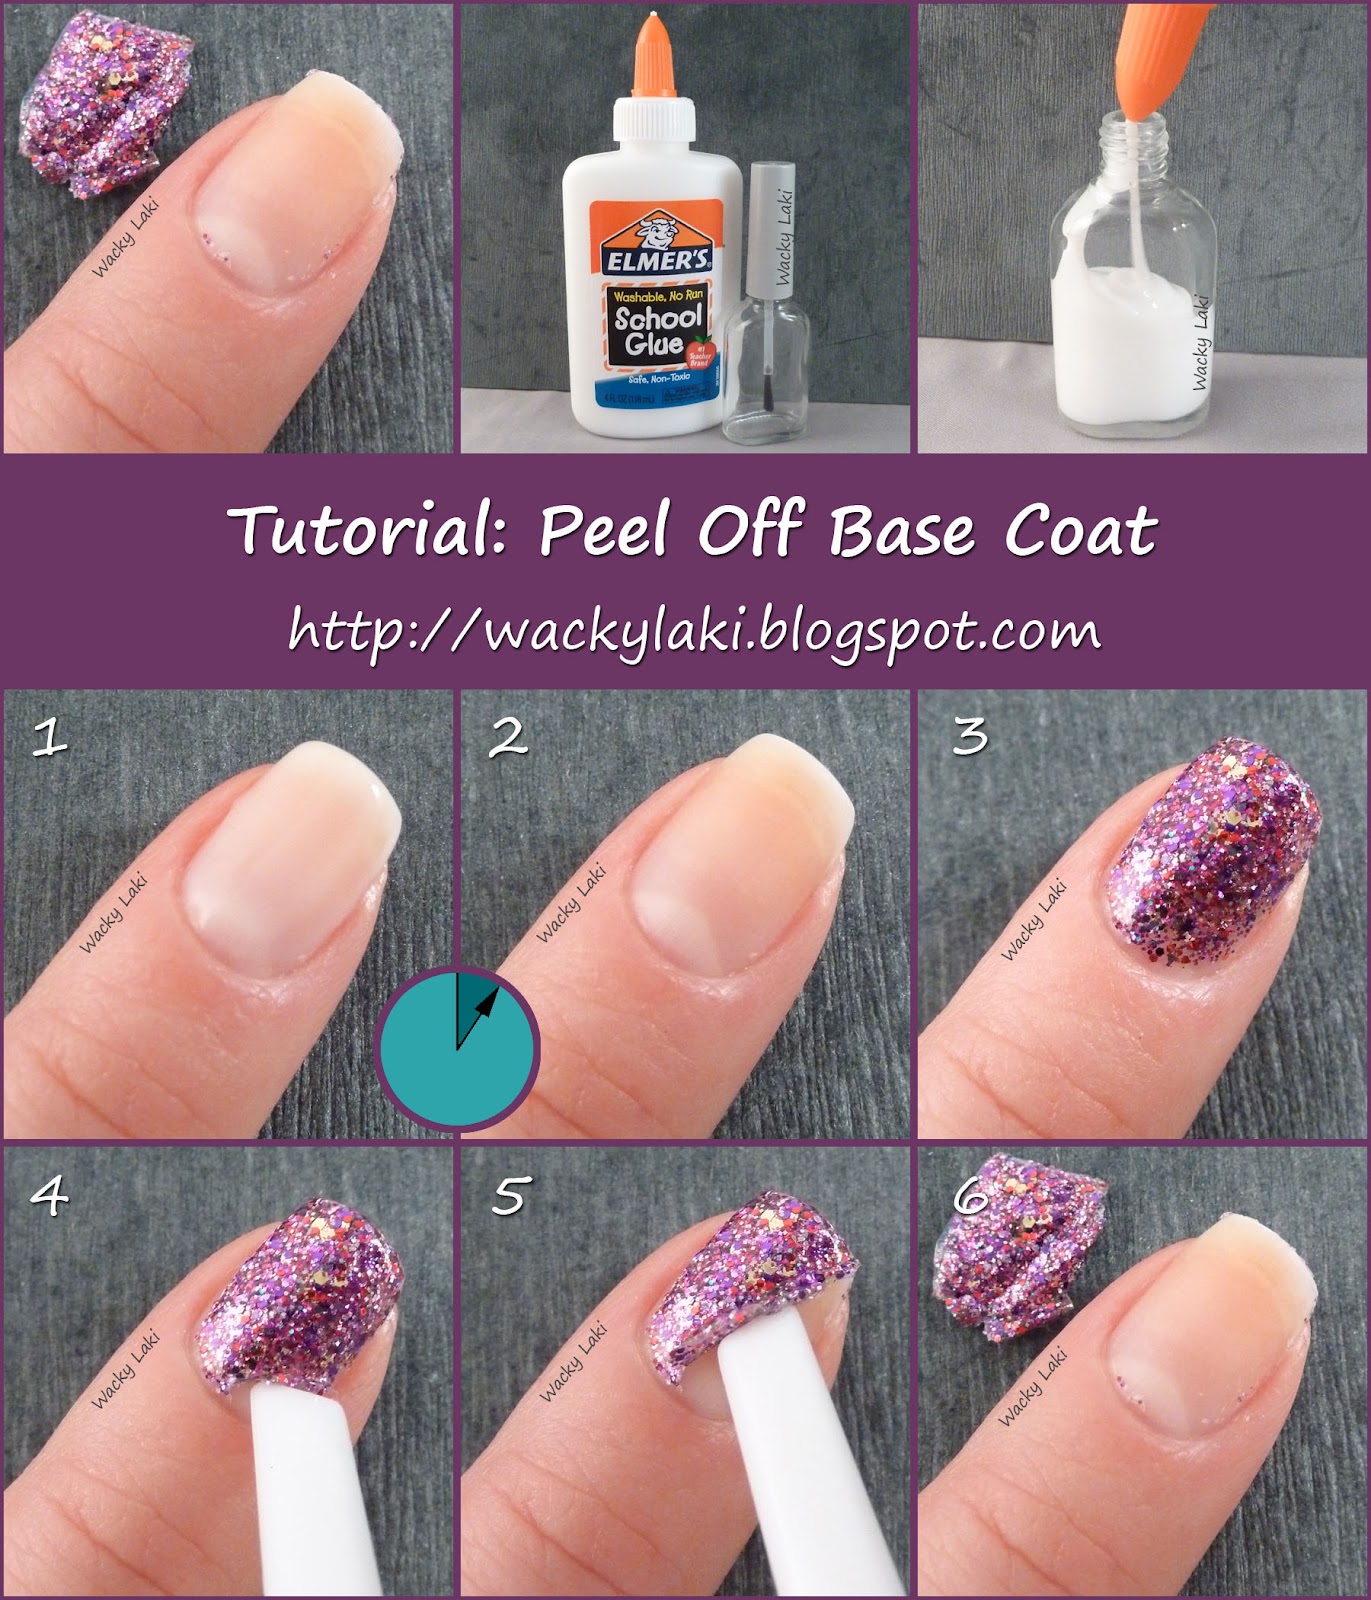
Instructions:
- Transfer some craft glue to an empty nail polish bottle and apply to clean bare nails as a base coat
- Allow the glue to completely dry. It will turn clear (slightly matte) and be non-sticky to the touch
- Apply any polish and topcoat as you normally would. Shown here is three coats of Shimmer Melissa with a topcoat.
- When you are ready to remove the polish, take a plastic cuticle pusher (or just use your other nails) and starting at the base of the nail and gently lift the edge
- Continue to peel the polish off
- Tada! Removing glitter polish has never been this easy. Wash hands to remove and remaining glue residue and you are done!
Enjoy your manicure!
I will definitely be wearing glitter more often now! A little bit of waiting for the "base coat" to dry is nothing compared with the pain of glitter polish removal!
How long does it last?
That will depend on whether someone picks at their nails or not. Using the craft glue as a base coat will certainly not last as long as other base coats especially for those who pick at their nails. For those who are not pickers it can easily last for a few days. I've tried it a few times and it has lasted perfectly for a full day of wear until I chose to remove it. It easily survived through showers and dish washing which was my primary concern with a water based glue...
Is it safe?
Craft glue is safe and non-toxic. Children for generations have used this in schools, some I'm sure have even eaten it (although I would not recommend that). I will venture to say it is much safer than soaking your nails in acetone to remove glitter...
Really brings back childhood memories of putting glue on my hand and letting it dry just to peel it off later...
Have you tried this technique? Let me know what you think of this or if you have any questions! :)
UPDATE: Gina of Soguesswhat11 did a fantastic test wear video of this technique. Take a look to see how it holds up to days of wear compared to a regular base coat and even basecoat under glue!
Thanks for looking!
Anutka :)
Wednesday, August 29, 2012
Mermaid Scales...
I often draw inspiration from the name of the polish so it is only natural that Nicole by OPI Mer-Maid For Each Other inspired a mermaid tail manicure. With a bit of stamping and a dash of glitter this is exactly what I envision a mermaid tail to look like. Now if only I could find one to confirm.... ;)


Tuesday, August 28, 2012
Plucked Chicken!
So the title might be a somewhat misleading... I did not actually pluck or otherwise harm any chickens! Just thought it would make for a funny title. My brother and his family got five baby chicks this past spring. They have been growing and shedding some pretty feathers. I happened to be at their house a few weeks ago and picked up a few feathers outside the pen that I thought where pretty. This is a manicure I've wanted to make for quite a while, although honestly I always assumed it would be with store bought feathers. This just made it more fun...


Friday, August 24, 2012
Shimmer Polish: Melissa, Jennifer, Stephanie, Tracy and Jenny...
Just as promised, I have more Shimmer polish pretties for you today. These are all created by the sweet and super talented Cindy. In case you missed yesterday's post, make sure to check it out here to see more Shimmer polishes. These are gorgeous, incredibly sparkly and all very unique. I'm already dreaming of the glitter jelly sandwiches and the gradient tips manicures I'll be trying with these, but for now take a look at the swatches...

Thursday, August 23, 2012
Shimmer Polish: Jasmine, Liana, Tammy, Linna and Vanessa...
I'm so excited today to show you some gorgeous glitter bomb creations by Cindy of Shimmer Polish. These polishes are all so unique and each one is an incredible mix of different color glitters that somehow work perfectly together. I honestly have not been this excited about glitter in a long time. That might be why I went a little crazy with photos, but I hope you don't mind...

Wednesday, August 22, 2012
OPI Germany Collection for Fall 2012: Part 2
As promised, I have for you today swatches of the second half of the OPI Germany Collection for Fall. You can see the first part of the collection here. This half gives us more gorgeous creams and shimmers making the game of favorites nearly impossible...

Tuesday, August 21, 2012
OPI Germany Collection for Fall 2012: Part 1
Although I not excited for actual fall to come, I am always excited for fall colors. When it comes to nail polish, I will take a dark, vampy fall color over a bright neon one any day. Today I have fore you the first half of a beautiful fall OPI Germany Collection. Hopefully you are as excited about these as I am...

Sunday, August 19, 2012
Missing Plate Mystery...
Today is Sunday Stamping and normally I would have a manicure to show you, but sadly I'm not in the mood. You see, I had the perfect idea in my head and it involved the plate BM-210. I can picture it now, a gold to orange to red gradient for the backdrop stamped with the leaf-like pattern from BM-210. It would have been perfect for the theme of "can't wait for fall." Sadly, it was not meant to be. The plate is nowhere to be found...

I last attempted to use it for a 4th of July manicure that didn't live up to my expectations. I changed my plan, but I'm sure the plate was hurt and decided to escape such shame. It must have fallen (or jumped) off the table and may have ended up in the trash. Maybe it escaped because it knew that I have no problem waiting for fall and I'm savoring every last bit of summer. Whatever the reason for the mysterious disappearance, I have been searching everywhere and cannot find the plate...The little monster is somewhere alone and probably scared without it's bundle...
I'm realize that most of you can't help, since 99.9% of you have not been to my house, but just in case it fell into the hands of some mean people trying to sell it, please keep an eye out for a lonely BM-210...
Until next time...
Thanks for looking!
Anutka :)
Saturday, August 18, 2012
Nicole by OPI Mer-Maid For Each Other vs OPI Just Spotted The Lizard
I briefly mentioned yesterday that when I first saw the new Nicole by OPI Mer-Maid For Each Other, I thought it might be a dupe for OPI Just Spotted The Lizard. You might already know that they are not dupes, but I figured a little comparison couldn't hurt. After all, they do look so much alike in the bottles...


Friday, August 17, 2012
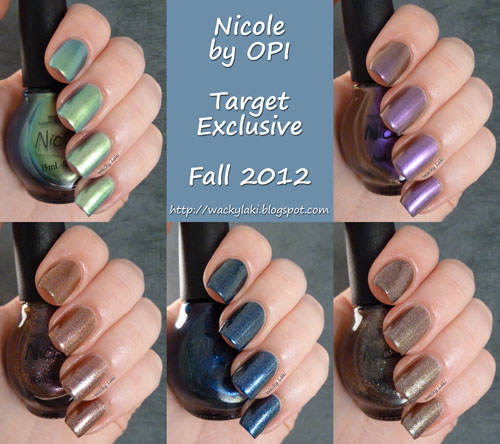
Nicole by OPI Target Exclusive for Fall
Nicole by OPI has released five new Target exclusive shades for this fall lineup that really knocked my socks off. Two beautiful duochromes and three fleck filled complex shimmer shades. Any polish that makes me stare at my nails as it changes colors or sparkles in the different light is a winner in my book. These all certainly had me taking a closer look, especially the fleck filled ones...
Thursday, August 16, 2012
OPI Luxurious and Indugence Flames
I wonder if anyone else had a strong urge to create a gradient using OPI Luxurious and Indulgence. I wanted to snatch them right out of the press release to try this. The intention was an orange to red gradient that would be a perfect backdrop for a sunset manicure. The gradient didn't turn out I had envisioned and I'll show you why, so instead of a sunset, I went with flames...


Wednesday, August 15, 2012
OPI Designer Series Indulgence and Luxurious for Fall 2012
OPI Designer Series for Fall 2012 features two gorgeous gold fleck infused polishes. I'm pretty much a sucker for anything with the gold flecks since they add wonderful dimension and sparkle to the polish. According to OPI, these are enhanced with real diamond dust for light-reflecting beauty...


Tuesday, August 14, 2012
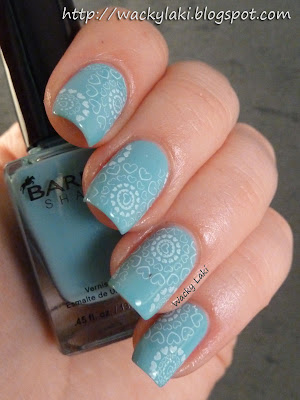
Barielle Swizzle Stix Stamped
I had a crazy three day swatching marathon of a weekend. Thrity polishes swatched to be exact, in between babysitting, cleaning, and a birthday dinner. I'm beat and drained with no energy to process any of the photos and facing daunting fact that I have to go to work today. Instead of waving the white flag and collapsing, I would like to share with you a manicure I wore a little while ago...

Sunday, August 12, 2012
Sunday Stamping: Double Stamp
It is time for another challenge in the group Adventures in Stamping. The challenge this week is to create a manicure featuring two different patterns. My mind instantly went to this barbed wire and roses combo on the new Bundle Monster plates. I have been wanting to try it since first seeing the plates and finally got a great excuse to try...


Friday, August 10, 2012
Barielle: Dazzling Diamonds Collection
Today I have some beautiful glitter topcoat polishes to show you from the new Barielle Dazzling Diamonds collection. For the swatches, I layered most of them over polishes from the Barielle Some Like It Hot collection that I showed a few days ago. These are all fun, versatile and can be layered over lots of different colors...


Thursday, August 9, 2012
Ulta Concrete Evidence Stamped with Barielle Surf's Up
As soon as I swatched Barielle Surf's Up*, I knew I had to try to stamp with it. My first thought was that it would work perfectly stamping over white to create a nice traditional porcelain china look, but I ended up going a slightly different way. As you might know, I tend to inject a bit of gray into my manicures. Maybe it is the gray Seattle weather, maybe it is to match my mostly black/gray wardrobe, maybe just my personality. Whatever it is, I like it and I'm sticking with it and I hope you don't mind...


Wednesday, August 8, 2012
Barielle: Some Like It Hot Collection
Hello everyone! Today I have for you swatches of the new Barielle Some Like It Hot collection. It consists of five polishes including four creams and one metallic shimmer. All are bright and perfect for summer. Without further delay, I hope you enjoy these beauties...


Tuesday, August 7, 2012
Tutorial Tuesday: Olympic Rings Nail Decal
I have been glued to the TV every chance I get watching the Olympic Games, especially the swimming and gymnastics. It is incredible to see the athletes perform. I have also been so impressed with some of the manicures sported by the ladies. My own Olympic inspired nails featured a little Olympic rings decal on one of the nails. I thought I would put together a tutorial on how I made it. Hope you enjoy...
Supplies:
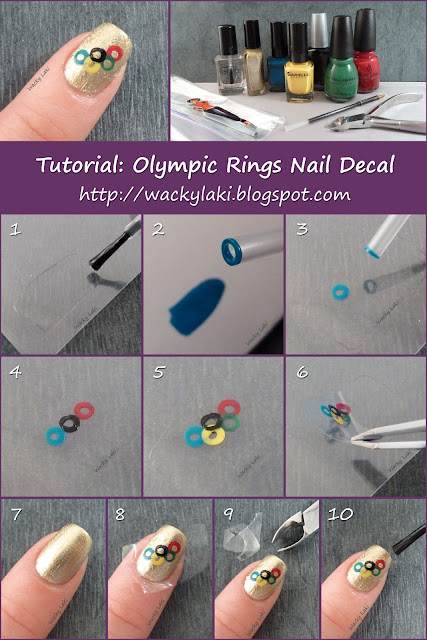
Instructions:
Thanks for looking!
Anutka :)
Supplies:
- Base color polish (I'm using Cosmetic Arts gold foil (no name))
- Clear polish
- Olympic ring corresponding colors:
- Blue (Barielle Surf's Up), Black (Wet 'n Wild Black Creme), Red (China Glaze Adventure Red-y), Yellow (Barielle Sunshine), Green (Sinful Colors Envy)
- Ziplock bag or sheet protector
- Ballpoint pen refill (ink cartridge)
- Tweezers, Cuticle nippers
Steps:

Instructions:
- Using clear polish paint a small rectangle on the plastic bag. Allow it to dry completely for a few hours.
- Make a small puddle of nail polish on a disposable surface. Dip the end of the pen refill into the polish.
- Press the pen refill onto the clear nail polish square to create a circle
- Repeat steps 2 and 3 to create the first row of circles
- Repeat the steps again to create the second row. Go back over the first row with any colors you might wish to overlap.
- Allow the polish to dry then using tweezers peel the decal off the plastic
- Apply desired number of basecoats of polish. Allow the polish to dry until it is sticky (not fully dry)
- Place the decal in desired position on the nail
- Using cuticle nippers, trim off the excess polish along the cuticles. Alternatively you can trim off excess clear polish prior to applying the decal to the nail
- Apply top coat and you are done!
I'd love to know what you think of this and don't hesitate to ask questions if something is not clear :)
Thanks for looking!
Anutka :)
Monday, August 6, 2012
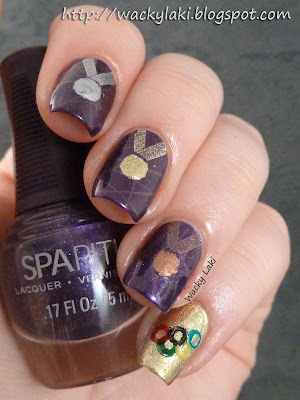
Olympic Nails Attempt #2
First I want to say thank you for all the comments to yesterday's Olympic manicure which I considered a fail. I just couldn't leave it alone and decided to redo the podium nails that bugged me. I chose this time to go with very simple medals over the same purple background...

Sunday, August 5, 2012
Sunday Stamping: Gold, Silver & Bronze
It is official, some manicure should just stay in my head and never be translated onto nail. I think this is one of them. This week the in the group Adventures in Stamping the challenge was to create a mani with gold, silver or bronze. Naturally my mind went straight to the Olympics and dreaming up this mess, which I swear looked much better in my head...


Friday, August 3, 2012
Ulta Snow White Stamped
I'm not sure if any of you remember the Sunday Stamping gemstone manicure from a few weeks ago. I had mentioned then that it was my second attempt at a manicure for the challenge, since I didn't feel that the first one captured the gemstone look as I wanted. In any case, this is that manicure. I had attempted to create an opal base by layering flakes and even though the opal effect didn't show up well in photos, I still love the manicure...


Thursday, August 2, 2012
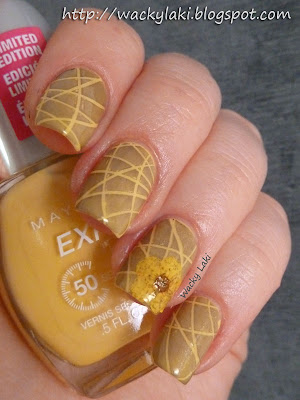
Maybelline Sunshine with Zoya Dovima and Born Pretty Dried Flowers
Sometime you just need a little sunshine in your life and while Seattle has had some wonderful days, they have not all been sunny. To compensate, I used Maybelline Sunshine and little yellow flowers from The Born Pretty Store. I think this was just what I needed on an overcast day...

Subscribe to:
Posts (Atom)